
What is Starfish?
Starfish is UW–Madison’s primary tool for scheduling individual and group student appointments–connecting students with advisors, staff, and other student support professionals.
Starfish:
- Simplifies scheduling with seamless Outlook integration
- Improves communication with easy referrals and email or text reminders
- Supports student success by helping students build a network of resources and people who can support their academic and career success
NOTE: Starfish can only be used for student-to-staff scheduling in the following areas:
- Academic advising
- Career services
- Learning support
- Peer advising/mentoring
- Student affairs and some other student services
Starfish is not currently available for use in the instructional (course-related) context.
Before Getting Started with Starfish

IMPORTANT: If your unit or department is not using Starfish, but you’re interested in starting, please email us at starfish.oacs@wisc.edu
Starfish 101 Training
Starfish 101 for staff is now a Canvas course that staff can complete independently on their own schedule. Please reach out to a Starfish administrator at starfish.oacs@wisc.edu to request access. Once you have access, click here to start the Starfish 101 Canvas Course.
All new Starfish staff users are highly encouraged to complete the Starfish 101 Canvas course. Experienced staff also have access to the Starfish 101 Canvas course and can use it to refresh their knowledge.
Additional Learning Resources
This is an accordion element with a series of buttons that open and close related content panels.
Getting Started
Watch video tutorial ![]() (6:01): Learn what the student experience of using Starfish looks like
(6:01): Learn what the student experience of using Starfish looks like
Step 1: Add Starfish to your MyUW homepage
- KB article: Accessing the Starfish App in MyUW
- Watch video tutorial
 (1:00)
Step 2: Set up your profile and Appointment Preferences
Step 3 (OPTIONAL): Set your email notification preferences
Adding and Managing Your Availability
- Watch video tutorial (5:31)
Cancel/Edit Appointment Availability
- Refer to above video tutorial beginning at 4:10
Making and Managing Appointments
Adding/Creating an Appointment
- Watch video tutorial (5:07)
Adding/Creating an Appointment for a “Prospective Student” (unaffiliated person)
- Watch video tutorial (2:13)
Calendar Managers
Frequently Asked Questions
This is an accordion element with a series of buttons that open and close related content panels.
What is Starfish?
Starfish is UW–Madison’s primary tool for scheduling student appointments–connecting students with advisors, staff, and other student support professionals.
How do I get access to Starfish?
Refer to the section “Who Can Access Starfish? > Staff” in this KB article.
Please note that the scope of our current Starfish implementation only covers the following use cases:
- Academic advising
- Career services
- Peer advising/mentoring
- Learning support
- Student affairs
- Some student services
Use cases that are not within scope include (but are not necessarily limited to):
- Instructional use (may be included in the future)
- Encounters where protected health information (PHI) would be documented
- Interviews for jobs, internships, fellowships, etc.
How do I allow students to schedule appointments with me in Starfish?
1. First, you must have a Starfish account and be provisioned with a staff role. Refer to the previous question “How do I get access to Starfish?” if you’re still on this step.
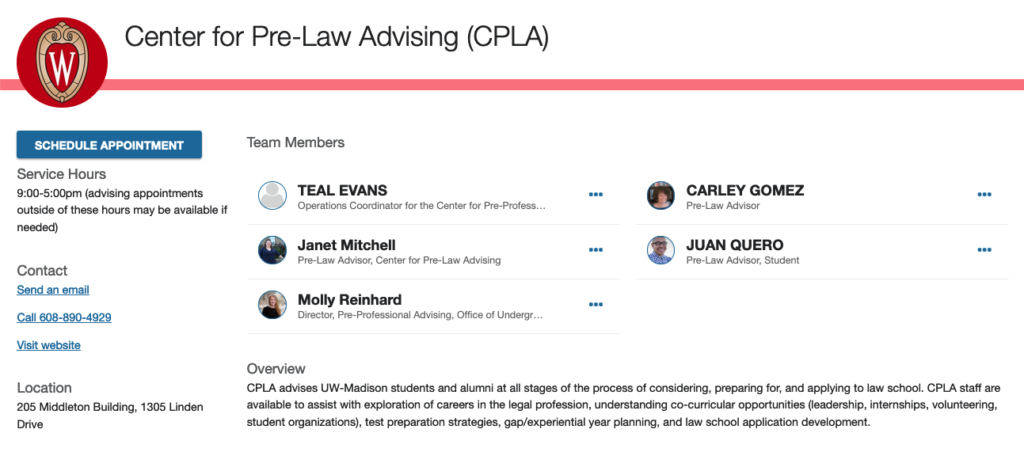
2. Next, you must be associated with a service profile. A service profile is a landing page for your unit that contains a list of members, a general overview, and other information like location and hours. You can be a member of as many service profiles as you need, and which service profile(s) you’re associated with has no effect on what types of appointments you can offer. You can see which service profiles you’re associated with by pulling up your individual profile (Open the Navigation Menu ![]() , select Services or My Success Network, and search your name). If you don’t come up, that probably means you’re not part of a service yet.
, select Services or My Success Network, and search your name). If you don’t come up, that probably means you’re not part of a service yet.
Only Starfish administrators can edit service profiles, so reach out to starfish.oacs@wisc.edu or submit a change request via the Create/Update Starfish Service Profile form if you need to be added or removed from one.
Example:
It’s not necessary to be a member of a service profile unless you personally meet with students. Administrative staff who manage other people’s calendars don’t have to be student-facing, and therefore are not usually included in service profiles.
3. Once you’re part of a service profile, create office hour availability. That will allow students to schedule appointments with you based on our availability.
What are appointment types/reasons, and how do I get access to them?
Every meeting you have with a student is associated with only one reason. Each meeting reason is part of exactly one appointment type. Appointment types are groups of reasons. As a staff member, when you create your availability you can select one or more appointment types to offer for that block. You cannot pick and choose which specific reasons you want to offer students – just the appointment types:

Which appointment types you’re allowed to offer in your office hours are determined by your Starfish role(s). Some roles grant access to multiple appointment types, and some appointment types are shared across different roles. For example, anyone with the General Advisor role can offer the appointment type Academic Advising (all students), and anyone with the Assigned Advisor role can offer Academic Advising (assigned students only). Those two roles are the most common because anyone with at least one assigned advisee in SIS will have them both automatically. Other roles (such as Career Counselor, Student Financial Aid Advisor, Study Abroad Advisor, etc.) have their own appointment types, and their memberships are controlled manually by Starfish administrators.
Example from student point of view: This advisor is offering three different appointment types: Academic Advising (all students), Career Advising, and SOAR Academic Advising.

The student expands the Academic Advising (all students) appointment type and selects one of its reasons.
![What do you need help with? Academic Advising (all students) [expanded to show reasons] Applying to... (Engineering, Business, limited enrollment programs) Course selection & schedule creation Current schedule changes Grades/GPA Major/Certificate declaration Major/Certificate exploration](https://oacs.wisc.edu/wp-content/uploads/2022/01/What-do-you-need-help-with-reasons.png)
I clicked my “Link to schedule an appointment with me” and I got an error. Is something wrong with my link or availability?
Probably not. The reason you’re getting an error is because you don’t have a student role in Starfish. The only people who can schedule appointments with you are students, so if you’re not a student then the scheduling link won’t work. If you want to verify that your scheduling link is working as it should, email starfish.oacs@wisc.edu and an administrator can check for you. If you work with student employees, you could also ask one of them to check.
How do I update my unit’s service profile?
These changes can only be done by an administrator. You can submit your change request via the Google form Create/Update Starfish Service Profile.
I would like to pull some Starfish reporting data for myself or my unit. How can I do that?
Starfish has a reporting module, but it’s only accessible by system administrators. To request data, please fill out this form with your report request and we’ll drop your results into a shared Box directory.
This may change sometime around 2024, when we hope to incorporate Starfish data into the Badger Analytics data warehouse and enable self-service reporting. (If you’re reading this after 2024 and that still hasn’t happened…sorry.)
I'm changing roles and I no longer need Starfish. How do I remove myself from the system?
If you need to deactivate your Starfish account, please do the following:
- Email starfish.oacs@wisc.edu and let us know. Currently there is no way to automatically remove you from the system upon your departure.
- End-date all of your office hours for your last day. This prevents students from scheduling with you after you’ve left.
- Make sure you don’t have any appointments scheduled after your departure date. If you’re unsure, a Starfish administrator can run a report to confirm (request here).
This is an accordion element with a series of buttons that open and close related content panels.
What is Calendar Sync and how should I set it up?
Calendar Sync controls how Starfish and Outlook (Microsoft Exchange) talk to each other. The settings can be found here:
Open sidebar ![]() > Click on your name > Appointment Preferences > Calendar Sync
> Click on your name > Appointment Preferences > Calendar Sync
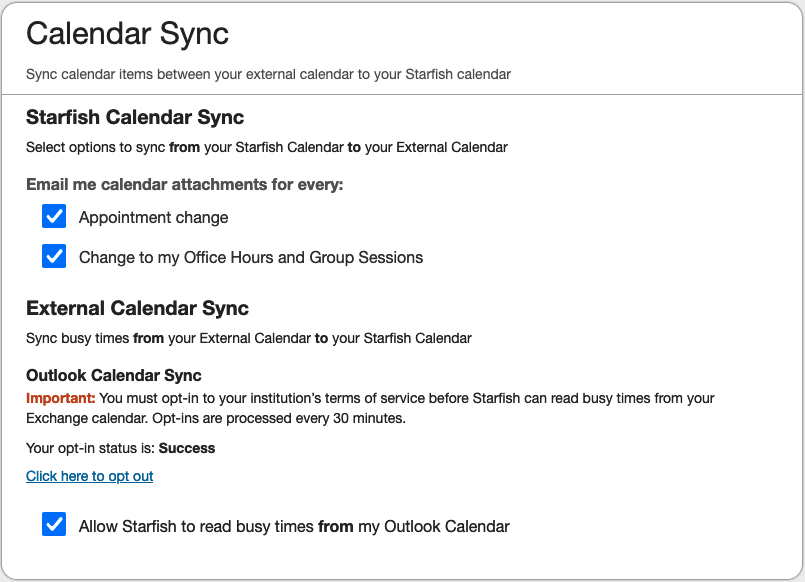
The first thing you’ll need to do is opt in, as this gives Starfish permission to access your Outlook calendar. After your opt-in is successful, it can take up to 30 minutes to start seeing your Outlook calendar items within Starfish.
Recommended settings:
- Email me calendar attachments for every…Appointment change: Always enable.
- We highly recommend this box always remains checked. There are very few instances where you would not want to receive a meeting invitation when a student books an appointment with you.
- Email me calendar attachments for every…Change to my Office Hours and Group Sessions: It depends.
- Some staff set aside certain parts of their days that are specifically reserved for student meetings. Other staff may allow students to schedule with them whenever they don’t have an Outlook conflict. Ultimately, the question you should ask yourself is whether you want your availability (not just your appointments) to appear as busy on your Outlook calendar. If the answer is yes, then you should check this box. If the answer is no, and you do not want your availability to block out time on your Outlook calendar, then you should leave it unchecked. If you’re not sure, go ahead and check the box, and you can always uncheck it later if it becomes a nuisance.
- Allow Starfish to read busy times from my Outlook Calendar: Always enable.
- This is a valuable feature that allows Starfish to automatically block out time slots where you have a conflict. Disabling this would require you to manage scheduling conflicts manually.
- This is a valuable feature that allows Starfish to automatically block out time slots where you have a conflict. Disabling this would require you to manage scheduling conflicts manually.
What happens if I decline the calendar invite that Starfish emails me?
We don’t recommend you do this as sending a decline RSVP sometimes cancels the meeting in Starfish, but not always. Because this behavior is unreliable, it is recommended to always accept the calendar invites from Starfish. If you want to cancel office hours or an appointment, do that directly on your Starfish calendar and it will send Outlook a cancellation.
If you use Windows, be careful of the Outlook setting “Auto Accept/Decline”:
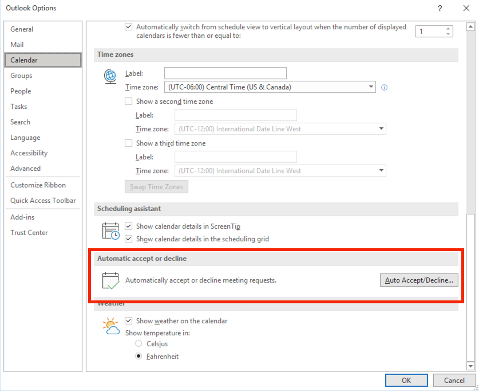
Auto-declining meetings can cause you to unintentionally cancel Starfish appointments with students. If you use Calendar Sync, auto-decline should be turned off.
Why didn’t I get a calendar invitation in Outlook when I created office hours in Starfish?
There could be a few things going on here.
First, verify that your Starfish account is set up to send calendar invites for office hours in the first place. The settings can be found here:
Open sidebar ![]() > Click on your name > Appointment Preferences > Calendar Sync:
> Click on your name > Appointment Preferences > Calendar Sync:
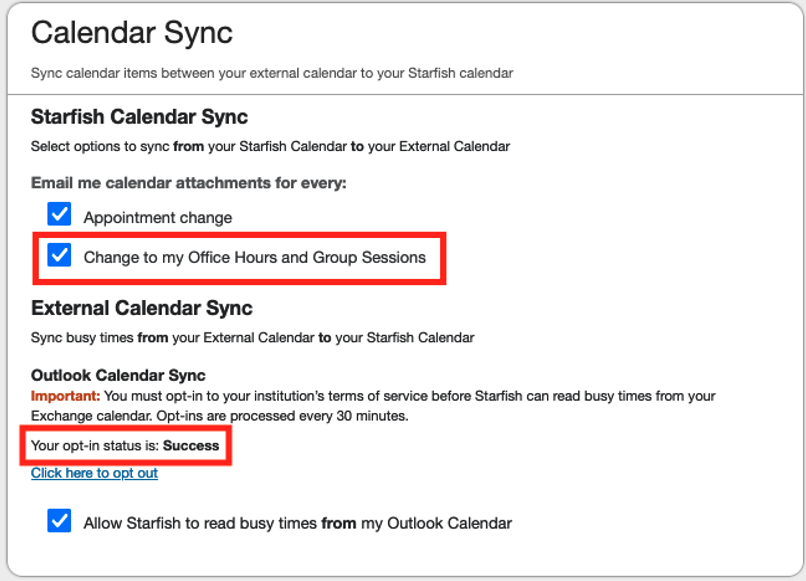
First, make sure that you see “Your opt-in status is: Success”. This initial set-up is necessary to establish the connection between your Starfish account and your Microsoft Exchange (Outlook) account. Next, ensure that the “Change to my Office Hours and Group Sessions” box is checked. Be advised that checking this will not retroactively send calendar invites for pre-existing office hour blocks.
If your settings match this configuration, allow up to 10-15 minutes for the calendar invite to come through. It’s usually much faster than this but delays can happen.
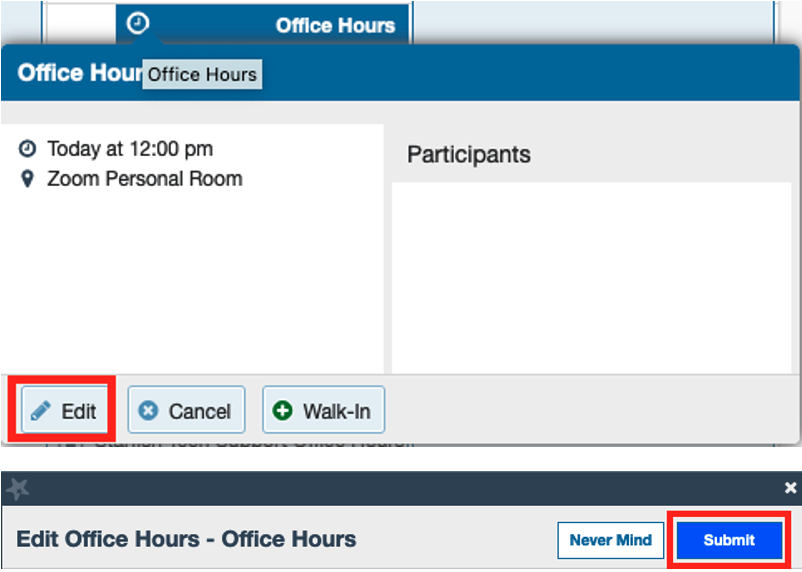
If you’re relatively certain that the calendar invite isn’t coming through, you can try to re-trigger the calendar message by going to Edit Office Hours and clicking Submit again. (You don’t need to modify the office hours before clicking Submit.)
If none of these steps work, contact starfish.oacs@wisc.edu for assistance.
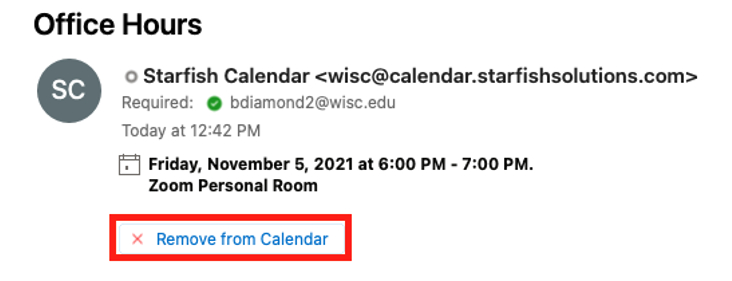
Why are my cancelled office hours still on my Outlook calendar?
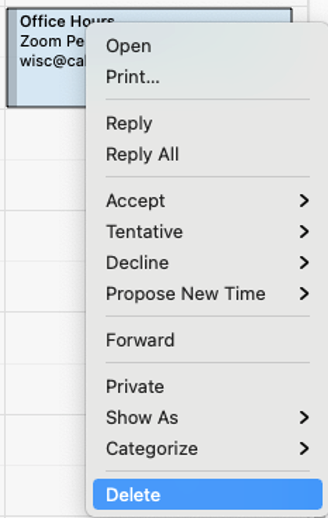
If you cancel an office hour block, Starfish will send Outlook a meeting cancellation message – the same as with any other meeting you’re invited to where the organizer cancels. However, the block will stay on your calendar until you click “Remove from Calendar” in Outlook.
macOS:
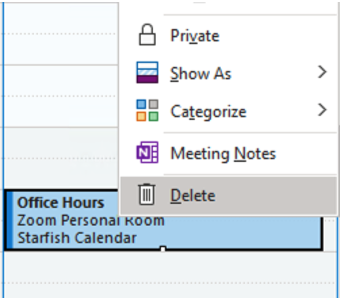
Windows:

Alternatively, if you can’t find this cancellation message then you can always right click the block itself on your calendar and delete it from the dropdown menu.
macOS:
Windows:
Do students get emailed about their upcoming appointments?
Yes. All students are sent an email confirmation at the time of scheduling, and this cannot be turned off. Students can also receive reminder emails:
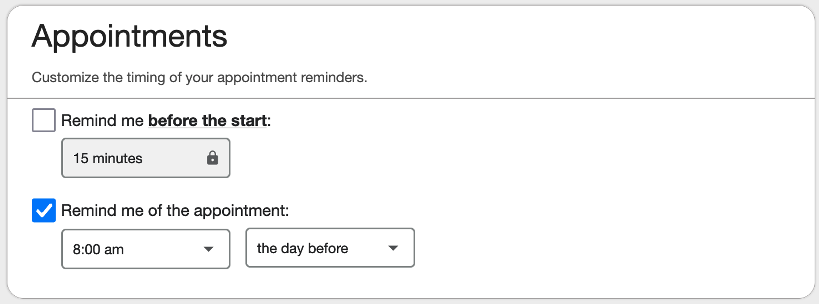
Students have ultimate control over their reminder notification settings, but by default they are opted in to receive reminder emails at 8:00 AM the day before their appointment.
My unit uses Google Calendar or another calendar service. Can Starfish integrate with that?
No, Starfish calendar integration at UW–Madison only supports Microsoft Exchange (Outlook, Teams, etc.). If you use Google or another calendar service, you have a few potential workarounds:
- Turn on notification emails, which can be set up in your notification settings (Open sidebar
 > Click on your name > Notifications).
 - Use the Starfish calendar to view all appointments, rather than using an external calendar.
- Some staff have attempted to set up automatic forwarding from Outlook to Google Calendar, but anecdotally we’ve heard that this method is not very reliable.
Another thing to keep in mind is Starfish’s ability to see when you have scheduling conflicts. If you use Outlook, Starfish will automatically remove time slots in your office hours where you’re unavailable:
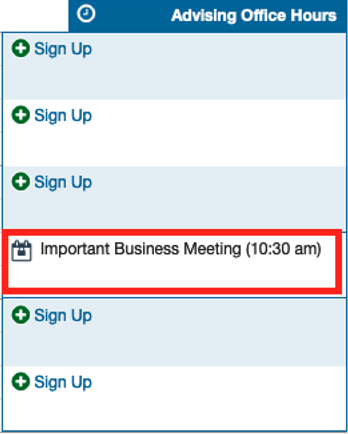
If you use another calendar service, Starfish has no way of knowing whether or not you have a conflict during your office hours. As a result, it’s up to you to ensure that you’re actually available when you have Starfish office hours scheduled.
This is an accordion element with a series of buttons that open and close related content panels.
What is the recommended way to hold virtual appointments?
People tend to use either Microsoft Teams or Zoom for meeting with students virtually. We recommend using the Zoom Personal Meeting ID and following the setup steps outlined in this document. Broadly speaking, these are the most important components:
- In your Zoom account settings, turn the Waiting Room ON. This prevents other people from joining your appointments unannounced and ensures privacy for your students.
- Also in your Zoom settings, turn off all passcode requirements and disable “Allow participants to join before host”.
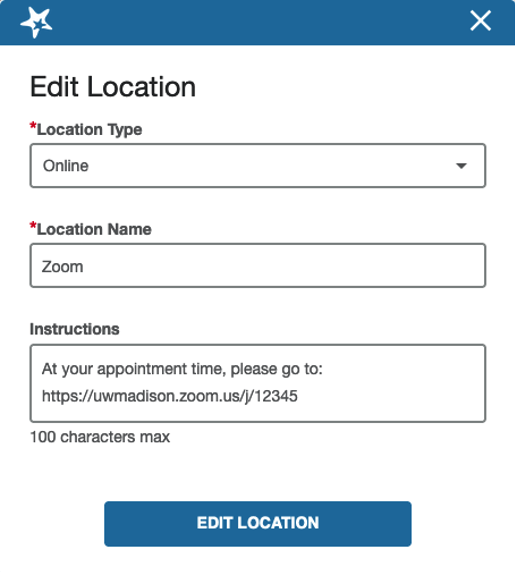
- Create a location for Zoom in your Starfish settings (Appointment Preferences > My Locations) that contains your Personal Meeting link:
The main reason we recommend Zoom over Microsoft Teams is because Zoom’s Personal Meeting is essentially your own virtual office, which eliminates the need to send out a Teams invite for every single meeting. It also prevents further manual effort if your Starfish meeting is moved or canceled.
If you still want to use Microsoft Teams, there are a couple things you can do to make the process easier on yourself:
- When sending out the Teams meeting invite from Outlook, set the meeting to Show As: Free. This will prevent you from getting the following error if you create/edit the Starfish meeting after the Teams meeting already exists:
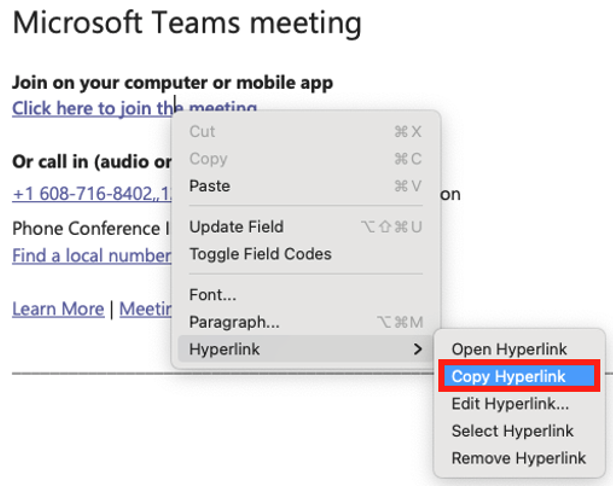
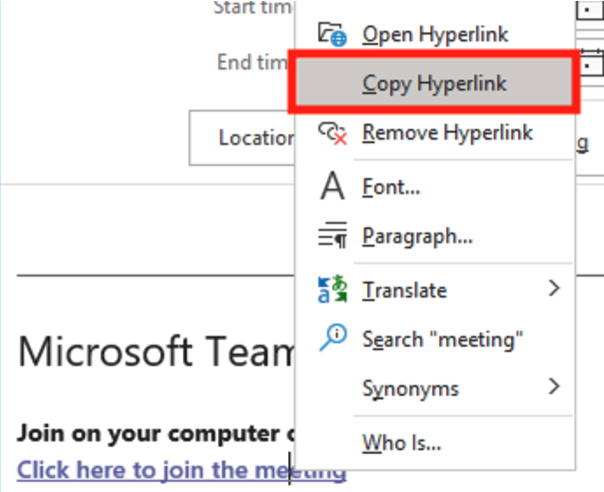
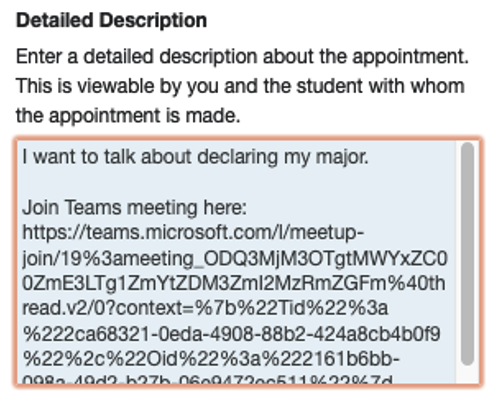
- Optionally, you can also copy the Teams meeting link and append it to the Starfish meeting info to keep information in one place.
- macOS:
- Windows:
- Starfish:
- macOS:

Is there a way to add breaks or buffers between my appointment time slots?
This is a common question we’ve gotten from staff who want to block out a short amount of time between their appointments – whether to finish documentation or other follow-ups, allow for appointments to run a bit over time, or simply to take a short break before seeing the next student.
Unfortunately there is no built-in option in Starfish’s office hours setup to say “Block out X minutes between my appointments,” so if you want to prevent solid back-to-back meetings you need to get a little creative. In our experience we know of three possible workarounds, each with their own tradeoffs:
1) Longer Time Slots
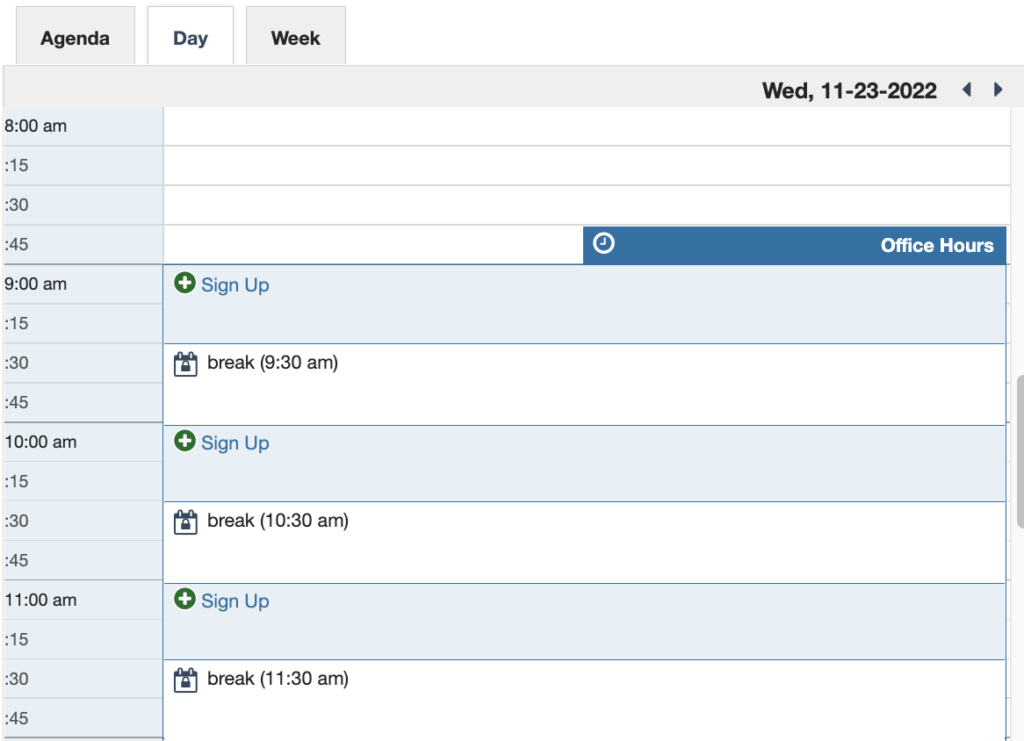
Instead of making the time slots match the actual length of your meetings with students, add on some extra time to account for breaks in between. The benefit of this method is that it requires very little extra effort on your part, but the downside is that you need to communicate with students that their appointments will be a bit shorter than advertised. Another downside is that you have limited flexibility for how long or frequent you want your breaks to be.
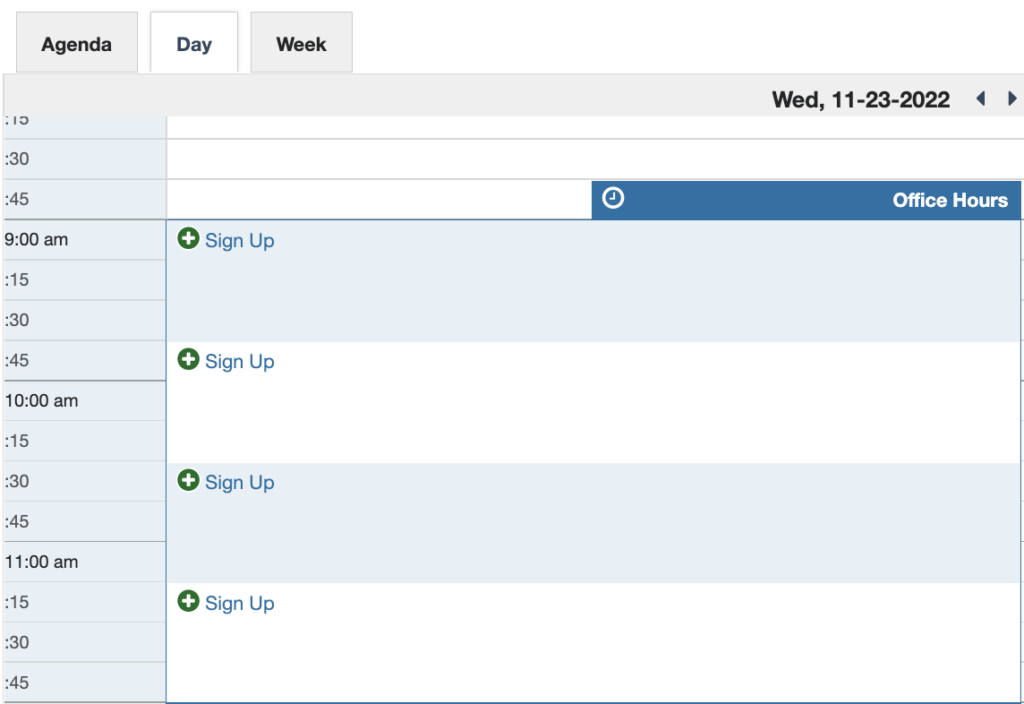
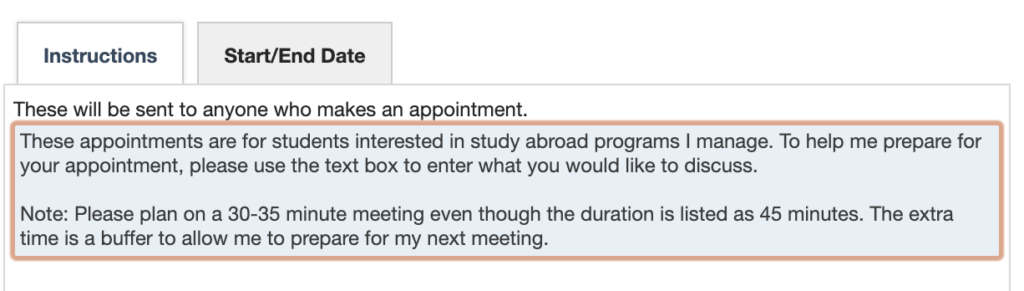
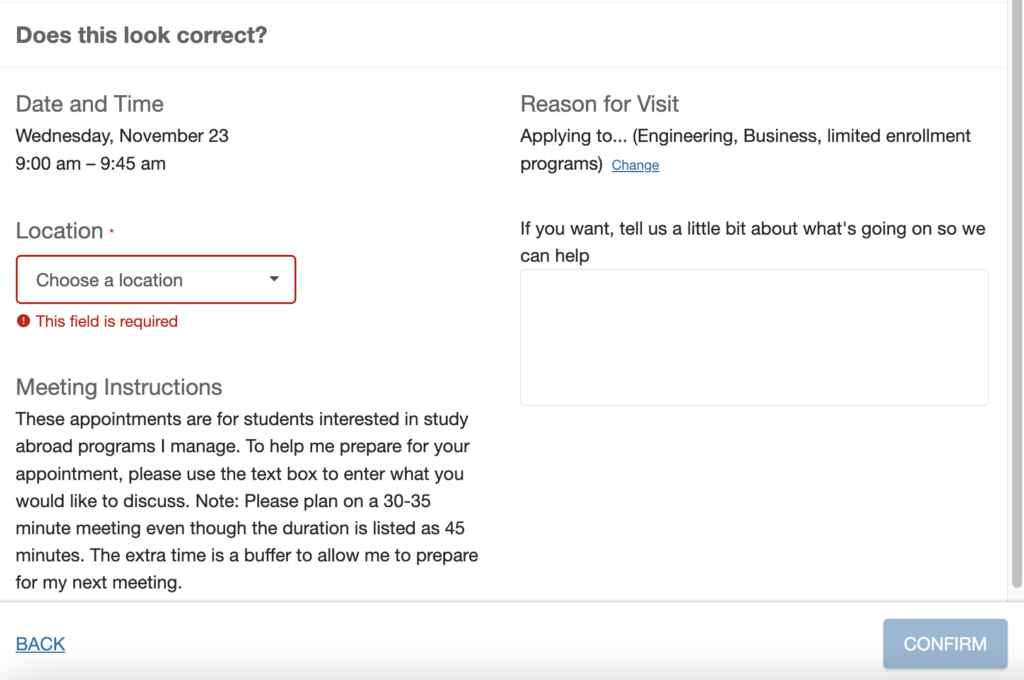
So for example, suppose you typically hold 30 minute meetings and would like 15 minute breaks in between. Instead of making the appointment length 30 minutes, make it 45 minutes instead. Then, let your students know through the meeting instructions that the actual appointment time will be a bit shorter in order to give you a buffer before your next appointment.

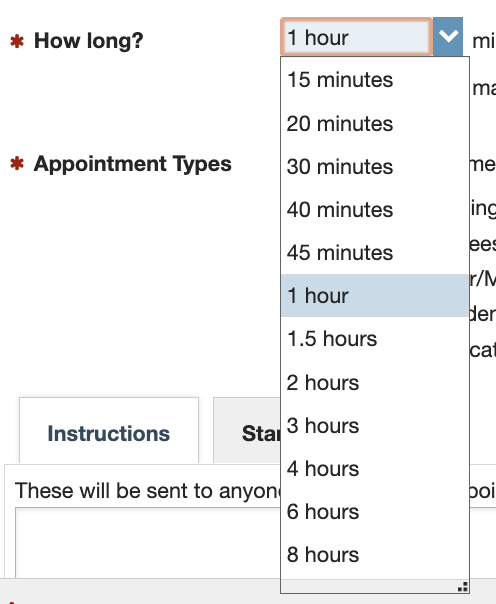
This method becomes less effective if your appointments typically last an hour or more. For example, if you want your student meeting to last a solid hour, the shortest break you can build in for yourself is 30 minutes. The reason is that the next longest appointment length after 1 hour is 1.5 hours:
2) Outlook Calendar Holds
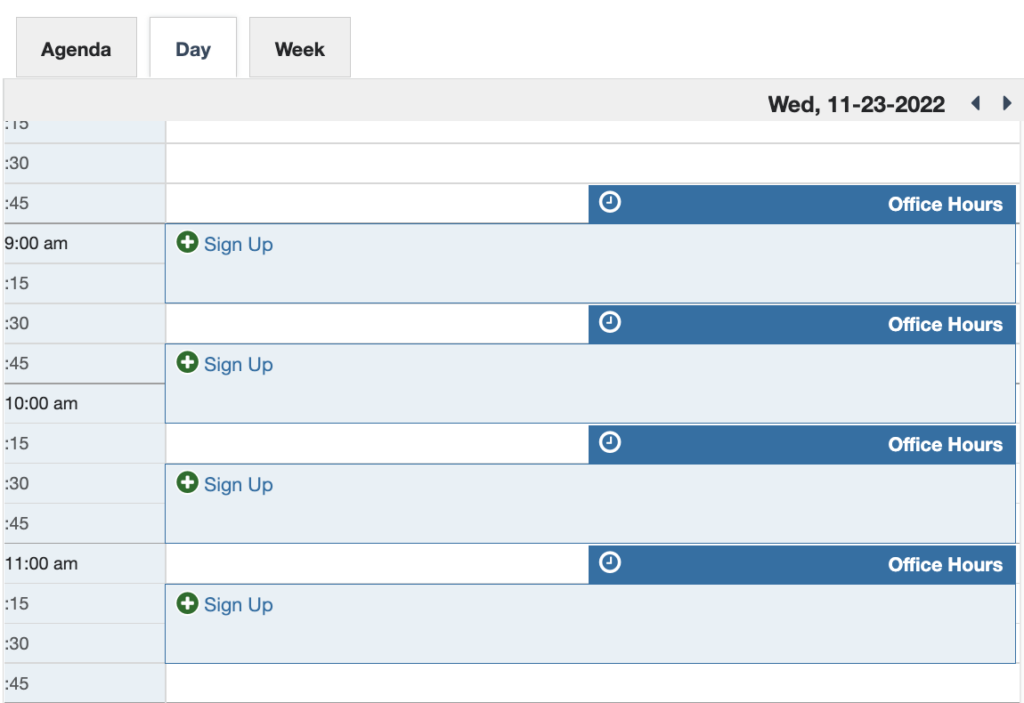
Create your Starfish office hours like normal, where the advertised duration is the same as the actual meeting duration, but then also create recurring Outlook conflicts that block out some of your Starfish time slots. The benefits are that the meeting duration advertised to students is accurate and that this can be more flexible than the first method. The big downside is that your breaks will be the same length as your meetings. The reason for this is that any external conflict will make an entire Starfish timeslot unavailable to students, even if the conflict is much shorter than the meeting timeslot.So if you schedule a 15-minute Outlook conflict in the middle of a 30-minute Starfish timeslot, the entire 30-minute time slot becomes unavailable to students.
Another major downside is that this requires extra effort in Outlook, because it’s easy to mess this up if you’re not very careful. For example, suppose you have a timeslot from 10:00-10:30 and another right after from 10:30-11:00. With this setup, a 2-minute Outlook conflict from 10:29 to 10:31 would block out the entire hour because it technically overlaps both time slots. So if you do this, check your Starfish calendar carefully to ensure that your external Outlook conflicts and your open appointment time slots align with each other as intended.
3) Multiple Office Hour Blocks
Instead of creating one office hour block that spans the whole day, make multiple, smaller office hour blocks that are separated by the length of your breaks. The benefits are that the durations advertised to students are more accurate, and that you have for greater flexibility for building in your breaks (such as only one break for every two meetings, or short breaks between long appointments). The glaring downside is that this creates a significant amount of extra work for you. Not only does it take several times longer to create your office hours, it also takes several times longer to make any changes.
For example, suppose you want to update the wording of your meeting instructions. If you have six different office hour blocks, you have to make that change six different times.
I'm temporarily out of the office, but I don't want to edit or cancel my entire Starfish office hour series. What should I do?
This is a perfect reason why you should always enable the option ”Allow Starfish to read busy times from my Outlook Calendar” in your Calendar Sync settings. With this feature turned on, you can simply create a calendar hold in Outlook for the duration of your outage (set the Show As option to “Busy” or “Out of Office”) and that will block out your Starfish availability.
You can also cancel individual office hour occurrences, similar to how you can cancel single meeting occurrences in Outlook…
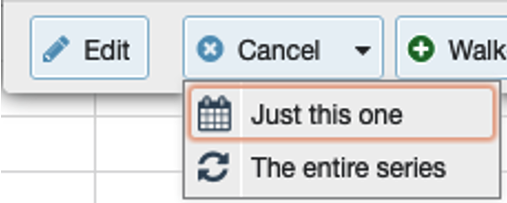
…but the calendar hold method is more convenient if you’re only out for part of your office hours, or if you’re out for multiple days at a time.
Is there a way for a student to schedule an appointment with anyone in my service, rather than someone specific?
Yes, there’s a feature called the “service calendar” that we can turn on for your unit. Reach out to starfish.oacs@wisc.edu or submit a change request via the Create/Update Starfish Service Profile form if you’re interested.
Should I set an end date on my office hours recurring series?
Yes, and generally we recommend end-dating your office hours series for the end of the current term. You can either use “On Date” or “End of Term,” but I prefer “On Date” because there’s no ambiguity. The reason you should set an end date is because your schedule may vary from one term to the next, so end-dating prevents students from scheduling too far into the future when you may no longer be available. After the end date, you should create a new office hour series from scratch rather than modifying your pre-existing series.
What is the difference between the appointment types “Academic Advising (all students)” and “Academic Advising (assigned students only)”?
If you select “Academic Advising (all students)” on your office hours, then all students of UW–Madison will be able to sign up for an appointment during that time. If you only select “Academic Advising (assigned students only)” then only students formally assigned to you in the Student Information System (SIS) as advisees will be able to create an appointment during that block. This distinction allows you to meet with any student of the institution while setting aside specific times for your advisees. Because your assigned advisees are a subset of all students, you should only pick one Academic Advising appointment type on a given office hour block – not both.
If you create two separate office hour blocks, one with “all students” and the other with “assigned students only,” be aware that your assigned advisees will see both options during scheduling. Refer to the following FAQ about exploring students for more on this.
I want to reserve time for exploring students who are interested in my department/program and aren’t assigned to me. Is there a way to create office hours that exclude my assigned advisees?
No, unfortunately an “Academic Advising (unassigned students only)” appointment type does not exist. The reason is that appointment type access is controlled by student-staff relationships as defined in SIS. While we can base an appointment type off of an established link between an advisor and an advisee, it would be prohibitively complex to try and link an advisor with everyone who isn’t their advisee. Thus, your assigned advisees will always have access to your academic advising office hours – both the “Academic Advising (all students)” and “Academic Advising (assigned students only)” appointment types.
The way around this is just to communicate with your students as best you can, and to use the title and instructions fields of your office hours as cues. If an assigned advisee schedules an appointment during time you want to reserve for non-advisees, you can reschedule them or cancel the appointment with a message indicating that they should choose “Academic Advising (assigned students only)” when scheduling.
What is the Scheduling Wizard?
The Scheduling Wizard is another way to set up office hours if your availability is highly variable from week to week. Essentially, it allows you to create a bunch of one-off office hour blocks en masse, as opposed to a recurring series where all occurrences start and end at the same time of day on a regular schedule.
If you can avoid it, we do NOT recommend using the Scheduling Wizard because it requires a lot of manual work. With the Scheduling Wizard, creating two weeks of office hours requires twice as much effort as creating one week of office hours.
In contrast, when you do the normal workflow by clicking the “Add Office Hours” button…
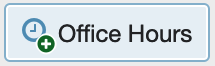
…creating a whole semester’s worth of office hours is no more difficult than creating a week’s worth.
If your availability to see students is unpredictable, we recommend the following approach:
- Use Calendar Sync integration with Outlook (open sidebar > click on your name > Appointment Preferences):
- Opt in, if you haven’t already.
- Check the “Appointment change” box.
- Uncheck the “Change to my Office Hours and Group Sessions” box.
- Check the “Allow Starfish to read busy times from my Outlook Calendar” box.
- Create a recurring office hours series that covers the days and times when you may potentially be available to meet with students. Don’t worry if you have a lot of Outlook conflicts that cover up most of that time – Calendar Sync will not allow students to book appointments with you when you’re busy.
How far ahead on my calendar can students see? Can I prevent students from accessing my office hours after a certain point in the future?
By default, the system will show students your availability for the next three weeks. However, students can flip ahead and select any future dates beyond that. Technically, if you don’t set an end date to your office hours, a student can schedule an appointment with you up to 10 years in the future. (And yes, we tested this out ourselves!)
Starfish has no built-in feature to bar access to your office hours after a certain number of days. Any office hours that exist on your calendar are fair game for students to schedule with you. However, this typically isn’t a problem for most staff. Unless your unit has very limited availability and high demand, students rarely schedule more than two to three weeks into the future.
If you find that blocking off your office hours after a certain date is necessary, there are a couple workarounds you can try:
- The End Date Method
- When creating your office hours series, decide how far into the future you want students to be able to schedule with you and set the end date to that. Then, as time passes, edit your office hours and continually push out the end date to create a rolling window. For example, suppose you only want students to access your availability up to 3 weeks in the future. To do this, you could make the end date 3 weeks away, and then extend the end date by one week every Friday afternoon. Keep in mind that this requires ongoing maintenance – forgetting to push out your end date may cause scheduling issues for your student.
- The Outlook Conflict Method
- This method requires that you have Calendar Sync set up according to our recommended best practices (see above). Once your Starfish office hours are set up, create a recurring Outlook event that conflicts with your Starfish office hours. Doing so will block out your Starfish availability. Then, delete specific occurrences of the Outlook conflict (say, for the next 3 weeks), and that will open up your Starfish availability during those times. Like the end date method, this requires ongoing manual effort. If you ever forget to delete your Outlook conflicts, then your Starfish availability will remain blocked off and students won’t be able to schedule with you. Also, if you ever reschedule your office hours, keep in mind that you’ll also need to reschedule the Outlook conflict.
My unit uses Starfish in cases where multiple staff (or even no staff) are present. Is it possible to put a single appointment/group session on more than one staff calendar?
Unfortunately, no, this is not possible. Starfish appointments and group sessions must have exactly one staff (a “provider”), and this is hard-wired into the system. This can make certain use cases inconvenient, such as…
- Learning centers where there are multiple tutors floating around
- Appointments where the student needs to meet with a few specific people at once
- Recurring group sessions that have a rotating group of facilitators
- Reserving use of facility resources, where the student won’t be meeting with anyone specific
Even though Starfish doesn’t work perfectly with these kinds of scenarios, it’s usually possible to come up with a decent workaround. Solutions vary based on the exact situation, so talk to a Starfish administrator (starfish.oacs@wisc.edu) to discuss options for your specific use case.
This is an accordion element with a series of buttons that open and close related content panels.
How does being in a service profile affect a student's ability to schedule with me?
If you are in at least one service profile (and you have office hours set up), then any student can find you. This almost always means that they can also schedule an appointment with you, but it depends on your role. If you are not in a service profile, then you are hidden from most (if not all) students in the system.
It’s worth noting that the appointment types you can offer are entirely determined by your user role(s). Which service profile(s) you’re in has no effect on what appointment types you can offer.
I am a student worker with staff-like privileges in Starfish. How do I get back to the student view where I can schedule my own appointments?
If originally you could only use Starfish as a student, but now you have another role like Student Peer Advisor or Student Calendar Manager, the system will appear very different to you. This can be a bit disorienting, and it might look like you no longer have the ability to schedule your own appointments as a student. Fortunately, the option isn’t gone – it’s just a bit less obvious.
Open the Navigation Menu by clicking the button in the top left corner ![]() , and then choose My Success Network. From there you can schedule an appointment for yourself like normal.
, and then choose My Success Network. From there you can schedule an appointment for yourself like normal.
When doing advisor assignments for SOAR students, how does the Effective Date affect Starfish?
Even though SIS has an Effective Date when assigning students to advisors…
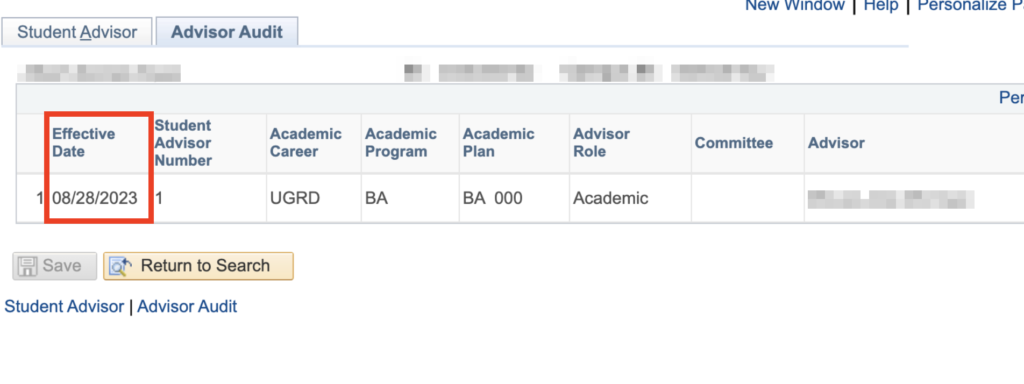
…Starfish does not use this exact date. For example, if it’s July and a student is queued up to become your assigned advisee in August, Starfish will treat them as your assigned advisee during July.
The reason for this is a bit complicated and not worth diving into here, but basically it’s a result of how our institution’s web service delivers data to Starfish and other apps. If the student isn’t yet enrolled, it will look forward to the next term and use the information it finds there.
We’ve explored what it would take to change this, but so far this hasn’t really had much of a negative impact on advisors. Some units actually prefer this, because it allows for easier follow-up after SOAR advising takes place. So as a result, at least for now, we’ve decided to leave it in place.
Can I create a generic Starfish account for my entire unit?
Before I answer this, I’m going to clarify some potentially ambiguous terminology:
- Service profile: This is the landing page for your unit in Starfish, which has a title, list of users, general overview, etc. Some people refer to this as their unit’s “service account,” but it’s not really an account per se. A service profile is little more than a named collection of staff members that is visible to students.
- Account: This is your individual Starfish user profile with your name, email, photo, settings, etc. An individual account can be a member of zero, one, or multiple service profiles.
Now back to the question: Is it possible to create a Starfish account that is tied to multiple people? The answer is no. Every Starfish account must be tied to exactly one individual person, and there is no way to create a generic account for your entire unit. Your account’s name, email address, and username are locked down and not directly editable within Starfish. (KB article: MyUW Madison – Update Employee Personal Information)
However, a service profile offers much more flexibility. A service profile’s membership list, title name, email address, description, or contact info can be configured however you’d like. Fill out and submit the form Create/Update Starfish Service Profile to request changes to your service profile.
Do I have to enable my share links on my profile in order for them to work?
No, the sliders just make them visible to other staff users on your profile (which we recommend).
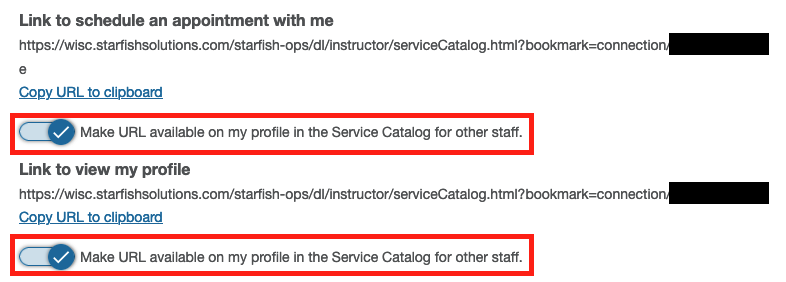
But your share links are active as soon as your account is created, and they will still work even if they’re not openly displayed on your profile. Note that students cannot see these share links on your profile page, just staff.
What should I set for Location Type when creating a new location?
- Office: Your primary physical office location
- Elsewhere: A secondary physical location where you may also hold appointments
- Online: Internet-based meeting tools like Zoom, Teams, etc.
- Phone: Meetings held via phone call
Location type is mainly used for reporting purposes, so even though it’s not visible to students it’s still important to select the appropriate option.
Is there a recommended browser for using Starfish?
Did we miss something? Let us know!
Help Resources Feedback