Now you’re ready to set up your Appointment Preferences. Please note, completing these account settings won’t add availability to your calendar – that is covered in a later section.
To access your Appointment Preferences, click the side bar icon ![]() in the top left corner of the screen, click your name, and select Appointment Preferences.
in the top left corner of the screen, click your name, and select Appointment Preferences.
Office Hour Defaults
![Office Hour Defaults Minimum Appointment Length selection field: 30 minutes Scheduling Deadline: Set a deadline for students to schedule appointments prior to the start of your office hours - No Deadline - The day before the office hours selection field: 5:00 pm [selected] - The day of the office hours selection field: 9:00 am - Hour(s) before the office hours selection field: 1 [separate enabled option] I want my schedule deadline to be flexible and allow drop-ins after the deadline has passed.](https://oacs.wisc.edu/wp-content/uploads/2022/01/appt-pref-1-defaults.png)
- Set your Minimum Appointment Length, the shortest amount of time you want to be available for an appointment. This is merely a default setting that can be overridden at the time you create your office hours.
- Set your Scheduling Deadline.
- There are four options:
- No Deadline: The student can book an appointment with you at a moment’s notice.
- The day before the office hours at: The student must book their appointment by this time at least a day in advance.
- The day of the office hours at: The student must book their appointment by this time on the day it will be held.
- Hour(s) before the office hours: The student must book their appointment with you at least this many hours before the start of your office hours. Note that this is before the start time of your office hour block, not before the start time of the appointment itself.
- Please note, you or your Calendar Manager can still manually add a student appointment after the deadline has passed. The deadline only prevents students from being able to self-schedule via Starfish.
- There are four options:
- The checkbox Allow drop-ins after deadline has passed doesn’t do actually do anything. You can ignore it – checking it or leaving it unchecked makes no difference.
Calendar Sync
![1. Calendar Sync - Sync calendar items between your external calendar to your Starfish calendar 2. Starfish Calendar Sync - Select options to sync from your Starfish calendar to your External Calendar Email me calendar attachments for every... - Appointment change [enabled] - Change to my Office Hours and Group Sessions [enabled] 3. External Calendar Sync - Sync busy times from your External Calendar to your Starfish Calendar Outlook Calendar Sync - Important: You must opt-in to your institutions terms of service before Starfish can read busy times from your Exchange calendar. Opt-ins are processed every 30 minutes. Your opt-in status is: Success (Click here to opt out) - Allow Starfish to read busy times from my Outlook Calendar [enabled]](https://oacs.wisc.edu/wp-content/uploads/2022/01/appt-pref-2-cal-sync.png)
- Click the link to opt in, which gives Starfish permission to to access your Outlook calendar. After your opt-in is successful, it can take up to 30 minutes to start seeing your Outlook calendar items within Starfish.
- Email me calendar attachments for every…Appointment change: Always enable.
- There is virtually no reason you shouldn’t receive meeting invitations when a student books an appointment with you. Therefore, we highly recommend that this box always remains checked.
- Email me calendar attachments for every…Change to my Office Hours and Group Sessions: It depends.
- Some people set aside certain parts of their days that are specifically reserved for student meetings; others are just “always available unless I have a conflict.” Ultimately, the question you should ask yourself is whether you want your office hours (not just scheduled appointments) to appear as busy on your Outlook calendar. If yes, then you should check the box. If no, then you should probably leave it unchecked. If you’re not sure, go ahead and check the box – you can always uncheck it later if it becomes a nuisance.
- Allow Starfish to read busy times from my Outlook Calendar: Always enable.
- This is a valuable feature that allows Starfish to automatically block out time slots where you have a conflict. Disabling this would require you to manage scheduling conflicts manually.
My Locations
Build the list of all possible Locations where you may meet with students. This might include:
- Physical offices
- Chat services
- Main office location
- Satellite locations
Adding a location to this list does not necessarily mean it will always be available to students – you will enable select locations later when you set up your availability.
- Click Add Location.
![My Locations - Customize your appointment locations Add Location button [highlighted] List of locations - Ingraham Hall Room 6; Office; Instructions: Wait outside the exterior door and I'll let you in at the time of our appointment. - Microsoft Teams; Online; You will receive an email invitation to a Microsoft Teams meeting. See our website for more details. - Phone; Phone; Please provide me the number (###-###-####) at which you would like me to call you for our meeting. - Memorial Union Terrace; Elsewhere; If you can't find me at the picnic tables, call me at (555) 555-5555. - Zoom; Online; Join here at the time of our meeting: https://uwmadison.zoom.us/j/12345](https://oacs.wisc.edu/wp-content/uploads/2022/01/appt-pref-3-locations.png)
This will raise the Add Location dialog box:
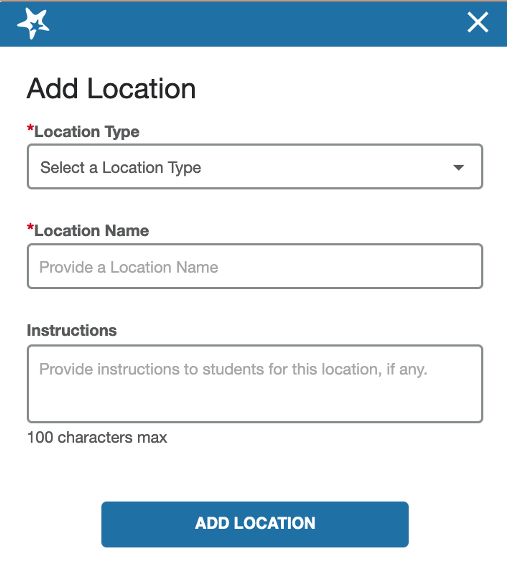
- Select a Location Type. There are four options:
- Office: Your primary physical office location
- Elsewhere: A secondary physical location where you may also hold appointments
- Online: Internet-based meeting tools like Zoom or Teams
- Consult this document for details on setting up your account for Zoom meetings.
- Phone: Meetings held via phone call
Location type is mainly used for reporting purposes, so even though it’s not visible to students it’s still important to select the appropriate option.
- Enter a clear, student-friendly Location Name.
Check in with your team to determine a consistent format for listing locations, and be mindful of students who may be unfamiliar with campus or your building. Ask yourself – how do students think of this location? For example:
- 333 East Campus Mall
- 333 ECM
- 333 East Campus Mall, 9th floor
- Enter Instructions for this location.(You can add appointment preparation instructions later on.) For example:
- Office/Elsewhere: 9th floor, check in at the front desk.
- Online: Join here at the time of our meeting: https://uwmadison.zoom.us/j/12345
- Phone: Please provide me the number (### – ### – ####) at which you would like me to call you for our meeting.
Calendar Managers
Starfish allows you to add Calendar Managers, or other users who can see and edit your Starfish calendar. Note that these instructions are for adding UW-Madison employees as Calendar Managers. If your unit is interested in having student employees serve as Calendar Managers, please fill out this Google form.
1. Click Add Calendar Manager.
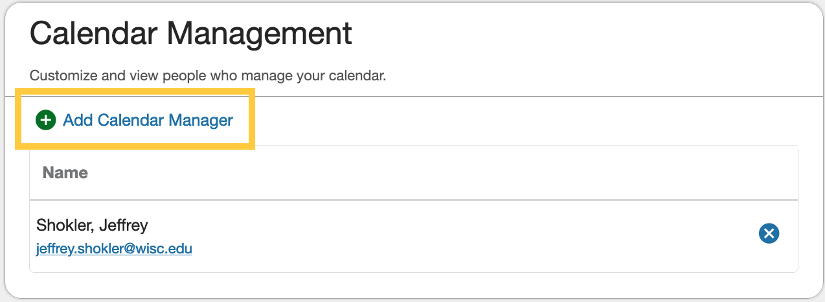
2. Search by name.
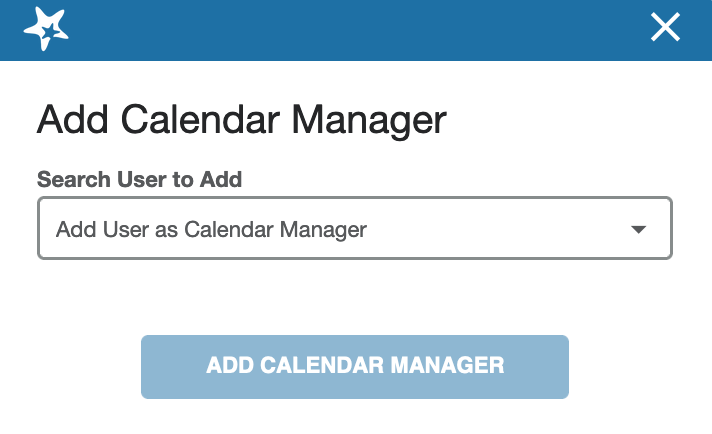
3. Select a user from the search results and click Add Calendar Manager.
Remember to click Save Changes at the bottom when you are done.
Your Appointment Preferences are set up and you can move on to Step 3: Set Your Email Notifications.